• Skip to primary navigation
  • Skip to main content
  • Skip to primary sidebar

All About Pork BBQ

  • Home
  • Contact Us
  • About Us
  • Sitemap

How To

How to Cook Pork Belly in Air Fryer

Pork belly is a symphony of textures and flavors: melt-in-your-mouth meat, a luscious fat layer, and the crown jewel – crackling, crispy skin. While traditionally achieved through slow roasting or searing, the air fryer presents a modern maestro, conducting heat for the perfect rendition of this culinary masterpiece.

In this article, we’ll guide you through the steps to achieve pork belly perfection in your air fryer.

The Symphony Begins: Preparing Your Score

  • Choose Your Cut: Opt for a skin-on pork belly with even marbling for optimal results. Ask your butcher to score the skin evenly (shallow cuts about 1/4 inch apart) for maximum crackle.
  • Pat and Season: Thoroughly dry the pork belly with paper towels. This is crucial for achieving crispy skin. In a small bowl, combine the olive oil, salt, black pepper, garlic powder, paprika, and Chinese five-spice powder if using. Mix well to create a flavorful rub. Massage this mixture evenly over the pork belly, ensuring every nook and cranny is coated.

Preparing pork belly

Setting the Stage: Air Fryer Preparation

  1. Preheat: Most air fryers function best when preheated. Consult your manual for the recommended temperature, typically around 400°F (200°C).
  2. Line the Basket (Optional): For easier cleanup, consider lining the air fryer basket with parchment paper.

Conducting the Heat: Cooking Techniques

Method 1: The Low and Slow Crackle

  1. Initial Render: Place the pork belly skin-side down in the preheated air fryer. Cook for 20-25 minutes at a lower temperature (around 300°F/150°C). This gently renders the fat, ensuring a tender interior.
  2. Crispy Transformation: Flip the pork belly skin-side up and increase the temperature to 400°F (200°C). Cook for an additional 20-25 minutes, monitoring closely for desired crispiness. The skin should puff and crackle beautifully.

Method 2: The Salt Crust Symphony

  1. Salty Transformation: Generously coat the skin with a thick layer of coarse salt. This draws out moisture and promotes crackling.
  2. Air Fry Magic: Place the pork belly skin-side up in the preheated air fryer and cook at 400°F (200°C) for 30-40 minutes. The salt crust will harden and transform into a beautiful, edible shell.
  3. Crackling Finale: Carefully remove the salt crust (it can be quite hot!), then brush the skin with oil and cook for an additional 5-10 minutes for extra crispness.

Cook Pork Belly in Air Fryer

The Grand Finale: Resting and Slicing

  1. Rest Before Serving: Transfer the cooked pork belly to a cutting board and let it rest for 10-15 minutes. This allows the juices to redistribute, resulting in a more flavorful and tender experience.
  2. Slice and Savor: Slice the pork belly against the grain into thin pieces and prepare to be mesmerized by the symphony of textures and flavors!

Bonus Tips:

  • Don’t overcrowd the air fryer basket. Cook in batches if necessary to ensure even airflow and crispy results.
  • Use a meat thermometer to check the internal temperature. For perfectly cooked pork belly, aim for 145°F (63°C).
  • Get creative with glazes and sauces! Brush the skin with honey for a sweet glaze or your favorite BBQ sauce for a savory twist.

With these techniques and a dash of culinary passion, you’ll be air frying pork belly like a pro, impressing your family and friends with every crackling bite. So, preheat your air fryer, unleash your inner maestro, and let the pork belly symphony begin!
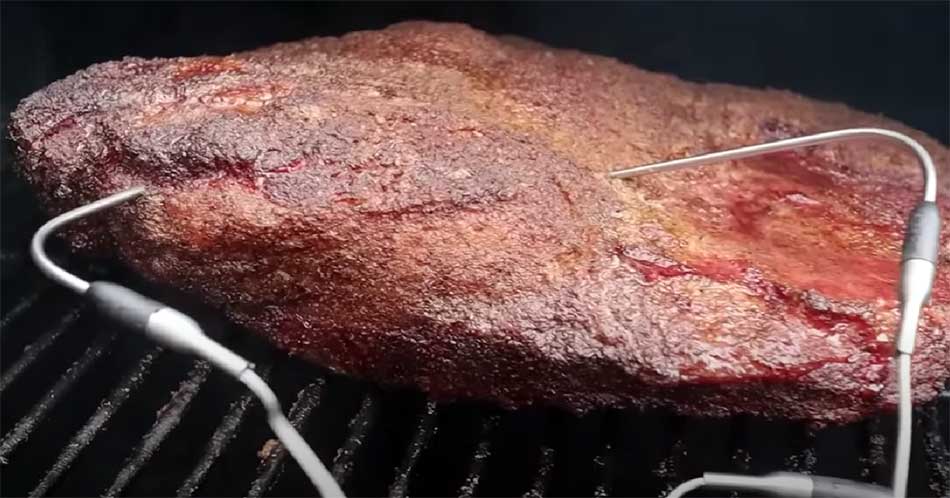
What Is The Best Internal Temp For Brisket?

Brisket is a popular cut of meat, especially in the southern United States. It is a tough cut of meat that requires low and slow cooking to achieve tender and juicy results.

One of the most important factors in cooking brisket is the internal temperature. In this guide, we will explore the best internal temp for brisket and how to achieve it.

What Temp is brisket done?

Temp For Brisket
The internal temperature of brisket refers to the temperature of the meat at its thickest part. The internal temperature is the determining factor for the doneness of the meat.

Brisket is considered fully cooked when it reaches an internal temperature between 205°F and 215°F.

Here’s a simple table that shows the best internal temperature range for brisket:

Brisket Doneness Internal Temperature Range
Medium-Rare 135°F to 145°F
Medium 145°F to 155°F
Medium-Well 155°F to 165°F
Well-Done 165°F and above

Note that the optimal temperature range for brisket also depends on personal preference, cooking techniques, and the type of meat.

Importance of Brisket Internal Temperature

Knowing the ideal internal temperature for brisket is crucial because it ensures that the meat is cooked safely and tasty.

The meat may be under cooked and unsafe if the internal temperature is too low. The meat may be overcooked and dry if the temperature is too high.

Brisket Flat Internal Temperature

The brisket flat is the leaner part of the brisket and is typically easier to cook. The ideal internal temperature for the brisket flat is the same as the whole brisket, which is between 205°F to 215°F.

Achieving the Ideal Internal Temperature

There are several methods to achieve the ideal internal temperature for brisket. One popular method is to smoke the brisket at a low temperature, between 225°F to 250°F for several hours until it reaches the desired temperature.

Another method is to cook the brisket in a slow cooker or oven at a low temperature for several hours until it reaches the ideal temperature.

Importance of Resting Brisket

After the brisket reaches the desired internal temperature, it is essential to rest for at least 30 minutes before slicing.

Resting allows the juices to redistribute throughout the meat, producing a more tender and juicy brisket.

Brisket Internal Temperature 205°F

The internal temperature of 205°F is the minimum temperature for a fully cooked brisket. The meat will be cooked and safe to eat at this temperature, but it may not be as tender and juicy as a brisket cooked to a higher temperature.

Brisket Internal Temperature 210°F

A brisket cooked to an internal temperature of 210°F will be more tender and juicy than a brisket cooked to 205°F. This temperature is ideal for those who prefer their meat to be more well-done.

Brisket Internal Temperature 215°F

A brisket cooked to an internal temperature of 215°F will be the most tender and juicy. This temperature is ideal for those who prefer their meat to be well done.

Best Brisket Internal Temp: 195°F

While the internal temperature for a fully cooked brisket ranges between 205°F to 215°F, many pitmasters and barbecue enthusiasts swear by an optimal temperature range of 195°F for a perfectly tender and juicy brisket. Try experimenting with different temperature ranges to find your perfect brisket doneness!

FAQs – Internal Temp For Brisket

What is the best way to check the internal temperature of brisket?

The best way to check the brisket’s internal temperature is to use a meat thermometer. Insert the thermometer into the thickest part of the meat, avoiding bones or fat.

What is the danger zone temperature for meat?

The danger zone temperature for meat is between 40°F and 140°F. To avoid foodborne illness, meat should not be kept in this temperature range for more than two hours.

Can I eat brisket if it is slightly undercooked?

No, it is not safe to eat undercooked brisket. The meat must reach a minimum internal temperature of 205°F to be fully cooked and safe.

How long should brisket rest before slicing?

The brisket should rest for at least 30 minutes before slicing to allow the juices to redistribute throughout the meat.

Can I cook brisket in a slow cooker?

Yes, brisket can be cooked in a slow cooker. Cook the brisket on low for 8-10 hours or until it reaches the ideal internal temperature.

Conclusion

Cooking brisket to the ideal internal temperature ensures the meat is safe and delicious. Whether you prefer your brisket to be well-done or more medium-rare, knowing the right temperature to cook it to is essential. Use a meat thermometer and follow the cooking methods outlined in this guide to achieve perfectly cooked brisket every time.

How To Smoke A Fresh Ham

Smoking fresh ham is a delicious way to cook this flavorful cut of meat. With a few simple steps, you can turn a fresh ham into a mouthwatering dish that will impress your family and friends.

In this article, we’ll look at what you need to know about smoking ham, the supplies you’ll need, and how to smoke fresh ham in three simple steps.

What do You need to Know About Smoking Ham?

Before you begin smoking fresh ham, it’s important to understand what this cut of meat is and how it differs from other pork products. Fresh ham is a pork leg not cured or smoked. It contains more moisture than cured ham and has a milder flavor.

When smoking fresh ham, you must add flavor and moisture to the meat by bringing or injecting it. Using wood chips or chunks in your smoker will also help to infuse the ham with a smoky flavor.

How To Smoke A Fresh Ham

Supplies You’ll Need to Smoke a Fresh Ham?

To smoke a fresh ham, you’ll need a few supplies:

  • A fresh ham
  • Brine or injection solution
  • Wood chips or chunks
  • Smoker or grill
  • Meat thermometer

How to Smoke a Fresh Ham (3 Simple Steps)

Step 1: Prepare Your Meat

The first step to smoking fresh ham is to prepare your meat. This involves either bringing or injecting the ham with a solution to add flavor and moisture.

For brining, you can use a mixture of water, salt, sugar, and spices. Submerge the ham in the brine for several hours or overnight in the refrigerator.

If you prefer to inject the ham, use a marinade injector to inject the solution throughout the meat. Be sure to inject the solution evenly into the ham.

Once your ham is brined or injected, let it sit at room temperature for about 30 minutes before placing it in the smoker.

Step 2: Set Up Your Smoker or Grill

Set up your smoker or grill for indirect heat. If using a smoker, fill the water pan and add wood chips or chunks to the smoker box or on top of the charcoal.

If using a grill, set it up for indirect heat by placing the coals on one side of the grill and the ham on the other side.

Preheat your smoker or grill to 225°F.

Step 3: Smoke Your Fresh Ham

Place the fresh ham on the smoker or grill grates, fat side up. Close the lid and let the ham smoke for several hours or until the internal temperature reaches 145°F.

Check the temperature of the ham with a meat thermometer at regular intervals. If using wood chips or chunks, add more as needed to keep the smoke going.

Once the ham is cooked to an internal temperature of 145°F, remove it from the smoker or grill and let it rest for 10-15 minutes before slicing and serving.

Smoke A Fresh Ham

Ingredients:

  • 1 fresh ham
  • Brine or injection solution
  • Wood chips or chunks

Instructions:

  1. Prepare your brine or injection solution.
  2. Brine or inject your fresh ham with the solution.
  3. Let your ham sit at room temperature for about 30 minutes.
  4. Preheat your smoker or grill to 225°F.
  5. Place your fresh ham on the smoker or grill grates, fat side up.
  6. Smoke the ham for several hours or until the internal temperature reaches 145°F.
  7. Check the temperature of the ham with a meat thermometer at regular intervals.
  8. Add wood chips or chunks as needed to keep the smoke going.
  9. Once the ham is cooked to an internal temperature of 145°F, remove it from the smoker or grill and let it rest for 10-15 minutes.
  10. Slice and serve.

Nutrition:

Smoked fresh ham is a good source of protein, with about 27 grams per 3-ounce serving. It is also high in fat, with about 14 grams per serving. However, if you trim off some of the fat before smoking, you can reduce the overall fat content. A 3-ounce serving of smoked fresh ham contains about 200 calories.

How to Brine All Cuts of Pork

Brining is a process that adds moisture to meat, while also tenderizing it, which makes it a great option for lean cuts of pork, such as tenderloin.

However, that doesn’t mean you shouldn’t attempt brining other cuts of pork as well because the result will always be meat that’s juicier and more tender. So, here are a few tips on how to brine all cuts of pork.

The Basic Brining Formula

The basic brining formula is one cup of table salt, preferably iodine-free, to one gallon of water. If using coarse salt, like kosher salt, then you will need approximately 1.5 cups per gallon, as coarse salt takes up more space, which means it weighs less by volume.

As long as you remember this ratio, you will always be successful in your brining attempts. Just remember that adding less salt won’t hurt the food, but adding to much salt can make the meat inedible. Ideally, the water should taste salty but not so salty that you gag.

Read: How To Smoke Baby Back Ribs

How to Brine All Cuts of Pork

How to Brine All Cuts of Pork

Brining is a process of soaking meat in a saltwater solution to enhance its flavor, tenderness, and moisture. Here’s a general recipe for brining pork:

Ingredients:

  • 1 gallon of water
  • 1 cup of kosher salt
  • 1/2 cup of brown sugar
  • 1 tablespoon of black peppercorns
  • 2 bay leaves
  • Optional: herbs and spices such as rosemary, thyme, garlic, onion, or mustard seeds

Instructions:

  1. In a large pot or container, combine the water, salt, brown sugar, black peppercorns, and bay leaves. Stir until the salt and sugar are dissolved.
  2. Add any additional herbs and spices you like to the brine mixture. You can customize the flavors to your liking.
  3. Submerge the pork in the brine mixture, making sure it’s fully covered. You can use a brining bag or a large container with a lid to keep the pork submerged.
  4. Refrigerate the pork in the brine for at least 4 hours or up to 24 hours, depending on the size of the cut. For larger cuts of pork, such as a pork shoulder, you may need to brine for 24-36 hours.
  5. After the brining time is up, remove the pork from the brine and rinse it thoroughly under cold running water to remove any excess salt.
  6. Pat the pork dry with paper towels and let it come to room temperature before cooking it.

Note: When brining pork, it’s essential to keep it refrigerated at all times to prevent bacterial growth. Discard any leftover brine after use as it may contain harmful bacteria.

How Long to Brine Your Cuts

Like with the amount of salt added, not brining for long enough isn’t a problem, whereas brining for too long will result in meat that is too salty to eat. In terms of how to brine all cuts of pork, there isn’t a standard time frame that applies to all cuts.

However, it’s important to keep in mind that even a little brining is better than none at all. Ideally, you’ll need at least a few hours, even for smaller cuts.

For a general idea, pork chops that are up to 1.5 inches thick will need to be brined between 12 and 24 hours, while a whole pork loin will take 2 days. The amount of time you brine a cut of meat for will be determined by the thickness, weight and grain of the meat.

Pork tenderloin’s long-running grain, for example, is better at pulling the brine into the meat, compared to pork chops, which is why a tenderloin will need 12 hours whereas chops can take up to 24 hours.

Read: How To Smoke A Pork Lion

Getting Creative

While water and salt alone will certainly make the meat juicier and more tender, the solution won’t add anything in terms of flavor. At the very least, you should be adding a sweetener, like sugar, maple syrup or molasses. Generally speaking, you should add about a cup of sugar or other sweetener to one gallon of brine.

You can use any other spices or herbs to give your meat that additional dimension. It’s usually a good idea, though, to make sure the spices you are using complement the recipe. For example, if you are making pork in mustard sauce, you could add some mustard powder and peppercorns to the brine.

When it comes to how to brine all cuts of pork, you can see that it’s quite a simple process, but a highly effective one. And it’s only time consuming in the sense that you have to wait for the meat to be ready, which will require some planning ahead. However, you’ll find that the meat is so tasty, tender and juicy that it really is worth it.

How to Reheat Pulled Pork?

Pork? Who doesn’t love pork? We all do! But with great food comes greater responsibility. Such is the case with our favorite pulled pork.

It varies in its flavor depending on recipes from different regions; but the core idea is pretty simple. The pork is ripped from the bone and shredded after it has been seasoned, smoked or slow-cooked, whichever way you want to have it.

Making pulled pork is a hell lot of work, much more than you would actually invest in for a single meal, but consistency is what will get you till the end game. Trust us, it’ll be worth it!

However, you have to be careful and when we say that, we mean it. It’s a very risky process because it can easily dry it out by making it tough, or the complete opposite can happen; it may become soft and rubber like.

So make sure you don’t waste that delicious meat and instead, try out these success-guaranteed ways to reheat pulled pork!

How to Reheat Pulled Pork

Here are top 3 way to reheat pulled pork

1. Pulled Pork in the Microwave

The most rapid way to reheat your pulled pork is through the top appliance: microwave. Place the pulled pork in a microwave-safe dish and cover with a damp paper towel. Microwave on high for 1-2 minutes per serving, or until heated through.

Its importance will always be understated; the machine does so much for us in terms of our appetite. You may feel that its unhealthy but there’s always a certain way to go about things, provided you follow them right.

It is essential that you store the juices gathered through the original smoking or cooking process. Leave those juices to cool down. Notice that once they have chilled out, a layer of fat is created on top.

In order for you to achieve the best outcome, you need to remove that layer. An easier alternative would be to keep the juice in the fridge. This will cool it down faster and because it will become rock solid, the act of scraping it off would be facilitated.

When you’re done taking the fat off from the top, put the juices into the meat right before you place it in the fridge. This is extremely important as far as moisture is concerned.

In case, you didn’t go through with this, for whatever reason, your pork will definitely lose its moisture when you reheat it; making it dry, rough and extremely uncomfortable to chew.

Now that you’re done with preparing it when you take it out to reheat the following day, mix up some apple juice, vinegar or barbecue sauce; just make sure you don’t add too much of it.

The time to reheat has finally arrived! Place the dish in the microwave, make sure that the temperature inside is around 165 degrees Fahrenheit and set the timer for about one to two minutes. And boom! You’re done reheating your pork. Rapid and simple but my least favorite way.

2. Pulled Pork in the Oven

Coming to the health conscious individuals, if your health comes first for you, then this is the method you need to go for. Its also the wiser option when you have a large amount of pork to reheat.

The process is quite similar to the one with microwave. Just like that, you need to leave the juices to dry out in your pan and take off that extra layer of fat.

Then put back the juices in the meat once they’ve cooled down and place it in the fridge. Preheat your oven to 325°F (160°C). Place the pulled pork in an oven-safe dish and cover with foil. Heat in the oven for 20-30 minutes, or until heated through. You can add a little bit of water or BBQ sauce to the dish to keep the meat moist.

3. Pulled Pork and Vacuum Sealing and Boiling

This is the best method to reheat pork as the real flavor isn’t lost. Keep the juices intact when you smoke or cook the pork. Remove the fat from top and pour back the juices into the meat before you seal it.

Vacuum seal the meat after which you can either refrigerate or freeze it. Boil water at a high temperature in a pot on the stove.

Take out the meat and place it in the water (after turning the stove) for 30 minutes till it comes to 165 degrees Fahrenheit. Mix it up with your favorite sauce and have fun!

All in all, the vacuum sealing method is most efficient and healthy way to reheat pork!

What Is The Best Way To Store Shredded Pork?

The best way to store shredded pork depends on whether you plan to use it immediately or save it for later use. Here are a few options:

Refrigerator: If you plan to use the shredded pork within a few days, store it in an airtight container in the refrigerator. Be sure to let it cool to room temperature before putting it in the fridge to avoid moisture buildup.

Freezer: If you want to save the shredded pork for a longer period, you can freeze it. Wrap it tightly in plastic wrap, then place it in a freezer-safe container or freezer bag. Be sure to label the container with the date so you can keep track of how long it’s been in the freezer. Also, consider portioning it out into smaller servings before storing it. This will make it easier to thaw and reheat only the amount you need.

Be sure to label your containers or bags of shredded pork with the date so you can keep track of how long it’s been in the fridge or freezer. This will help you avoid eating old, potentially unsafe food.

If you have a large amount of shredded pork, consider freezing it in batches rather than all together in one container. This will make it easier to use only the amount you need without having to thaw the entire batch.

Vacuum Sealer: If you have a vacuum sealer, this is an excellent way to store shredded pork for an extended period. Place the pork in a vacuum-saleable bag and remove as much air as possible before sealing it. This method helps prevent freezer burn and can keep the pork fresh for up to six months in the freezer.

Regardless of how you choose to store your shredded pork, it’s essential to handle it safely to avoid food borne illness. Be sure to refrigerate or freeze it promptly after cooking, and always reheat it to an internal temperature of at least 165°F (74°C) before serving.

Use airtight containers: When storing shredded pork in the fridge or freezer, use airtight containers to prevent moisture and air from getting in. This will help keep the pork fresh for longer.

How Long Does Pulled Pork Last In The Fridge?

Pulled pork can typically last in the fridge for 3-4 days if stored properly. It’s important to refrigerate the pulled pork within two hours of cooking it to prevent bacterial growth.

To store pulled pork in the fridge, transfer it to an airtight container or a resealable plastic bag. Be sure to let it cool down to room temperature before putting it in the fridge to avoid moisture buildup. Label the container with the date so you can keep track of how long it’s been stored.

If you’re unsure whether the pulled pork is still safe to eat, look for signs of spoilage, such as a sour or rancid odor, mold, or a slimy texture. If you notice any of these signs, it’s best to throw the pulled pork away to avoid the risk of food borne illness.

Primary Sidebar

Recent Posts

  • Smoked Pikes Peak Roast
  • 5 Best Charcoal for Hibachi Grill
  • How Much Pulled Pork Do You Need Per Person?
  • How to Cook Pork Belly in Air Fryer
  • Condiment Drizzled on a Taco

Categories

  • Guides
  • How To
  • Recipes

Copyright © 2025 · Authority Child Theme on Genesis Framework · WordPress · Log in